
In this post, I’ll show you how to get Selenium Grid up and running on Kubernetes cluster using Helm package manager.
Selenium Grid
Selenium Grid makes automation execution jobs much easier. Using Selenium Grid, one can run multiple tests on multiple machines in parallel, which reduces execution times from days to hours. However, setting up our own Selenium Grid means we have to configure browsers across multiple machines, virtual or physical, and making sure each machine is running the Selenium Server correctly. This also means maintaining the Grid and making updates would be a time-consuming. This is where Kubernetes comes in and saves the day!
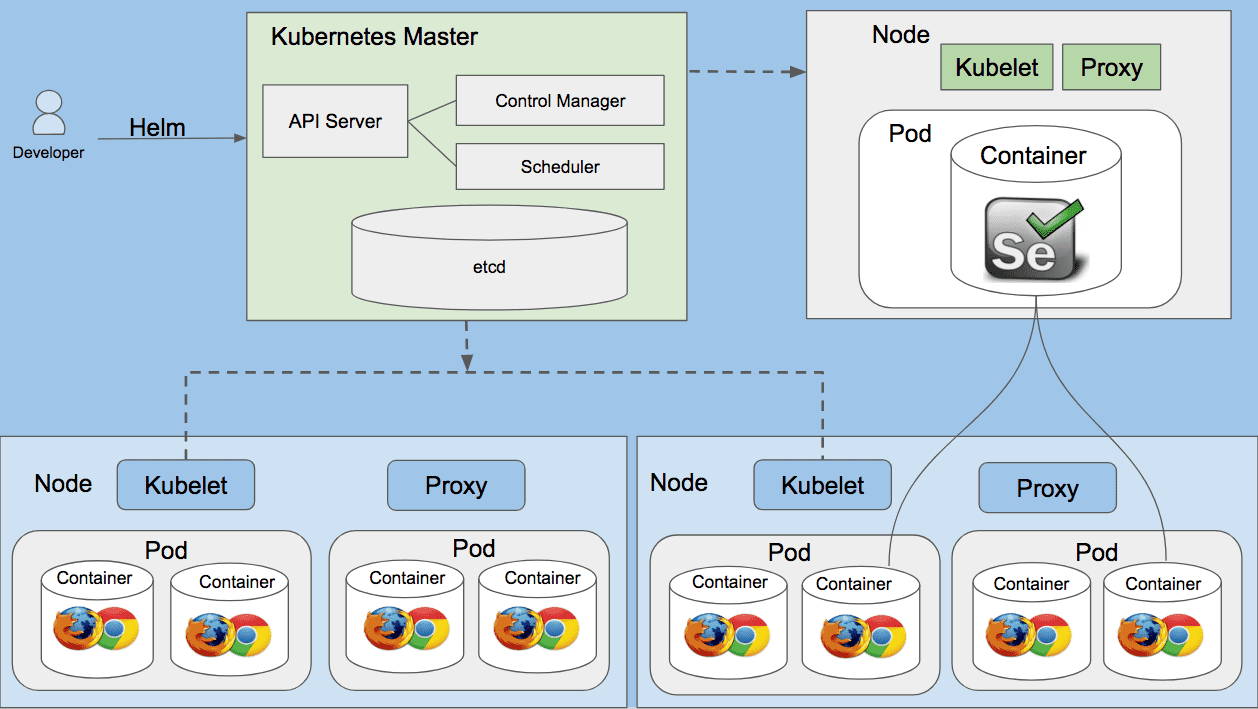
Kubernetes
Kubernetes is an open-source system for automating deployment, scaling, and management of containerized applications.
Helm
Helm is a package manager for Kubernetes applications, responsible for installing and managing Kubernetes applications. Helm packages all of the different Kubernetes resources (such as deployments, services, and ingress) into a chart, which may be hosted in a repository. Users can pull down charts and install them on any number of Kubernetes clusters. This is similar to Homebrew and apt-get package manager. We will use Helm to deploy selenium-grid on Kubernetes Cluster.
What We’ll Accomplish
- Set up a Kubernetes cluster using Docker for Mac
- Deploy Selenium-Grid to the cluster
- Running selenium test and viewing your Selenium tests running on Kubernetes cluster
Prerequisites
- kubectl - macOS users can use
brew install kubectlto install - Docker for Mac - Docker with Kubernetes is currently only available on Docker for Mac in the latest Edge version
- Virtualbox - macOS users can use
brew cask install virtualboxto install - Helm - macOS users can use
brew install kubernetes-helmto install
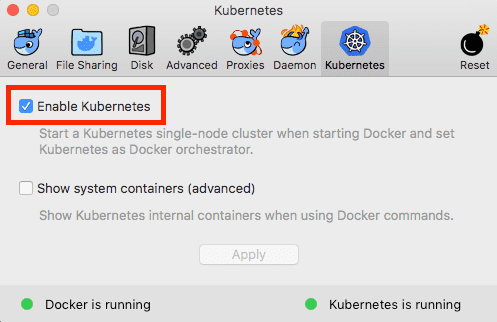
Enabling the local Kubernetes cluster
Click the Docker icon in the status bar, go to “Preferences”, and on the “Kubernetes”-tab, check “Enable Kubernetes”. This will start a single node Kubernetes cluster for you and install the kubectl command line utility. This might take a while, but the dialog will let you know once the Kubernetes cluster is ready.
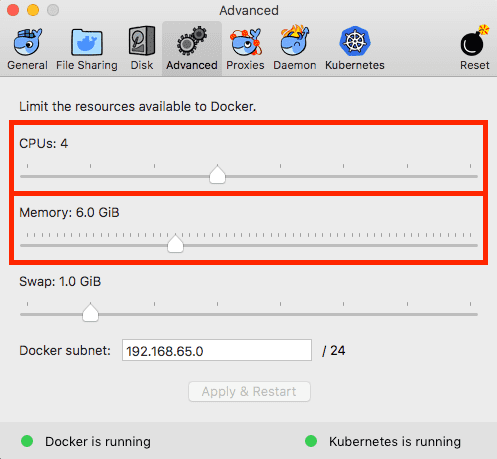
Next step, you’ll need to increase Docker’s available memory to 4GB or more.
Click the Docker icon in the status bar, go to “Preferences”, and on the “Advanced”-tab, change memoery to 4GB or more.
Selenium Grid installation
To install the chart with the release name selenium-grid:
helm install --name selenium-grid stable/selenium \
--set chromeDebug.enabled=true \
--set firefoxDebug.enabled=true
The command deploys Selenium Grid on the Kubernetes cluster in the default configuration with chromeDebug and firefoxDebug enabled.
Note: You should see the following output after executing helm install ...
NAME:   selenium-grid
LAST DEPLOYED: Fri May 11 23:09:29 2018
NAMESPACE: default
STATUS: DEPLOYED

RESOURCES:
==> v1/Service
NAME                        TYPE          CLUSTER-IP      EXTERNAL-IP  PORT(S)         AGE
selenium-grid-selenium-hub  LoadBalancer  10.110.225.161  localhost    4444:30665/TCP  0s

==> v1beta1/Deployment
NAME                                  DESIRED  CURRENT  UP-TO-DATE  AVAILABLE  AGE
selenium-grid-selenium-chrome-debug   1        1        1           0          0s
selenium-grid-selenium-firefox-debug  1        1        1           0          0s
selenium-grid-selenium-hub            1        1        1           0          0s

==> v1/Pod(related)
NAME                                                   READY  STATUS             RESTARTS  AGE
selenium-grid-selenium-chrome-debug-6d8898d7c4-7psdh   0/1    ContainerCreating  0         0s
selenium-grid-selenium-firefox-debug-84f6f484d8-wh66d  0/1    ContainerCreating  0         0s
selenium-grid-selenium-hub-f7f874cd-p5lrd              0/1    ContainerCreating  0         0s
Selenium hub will automatically start-up using port 4444 by default. You can view the status of the hub by opening a browser window and navigating to: http://localhost:4444/grid/console

Run Selenium Test
Let's run a quick Selenium test to validate our setup.
Clone this github repo:
git clone https://github.com/sayems/selenium.grid.gitGo into the github repo directory
$ cd selenium.gridRun tests
Before you run docker-compose up, make sure Selenium grid is up & running on Kubernetes cluster, you can run the following command: $ kubectl get pods to see Selenium pods.
$ docker-compose upIt typically takes several minutes for docker setup for the first time, so wait for few minutes ...
Debugging with VNC Viewer
It is useful to be able to view your Selenium tests running on Kubernetes cluster. This can help us to debug issues better and have more confidence in our tests. To view running tests on Kubernetes cluster.
- Download VNC® Viewer for Google Chrome
- Execute the following command to bind ports between Kubernetes cluster to the local machine:
  kubectl port-forward --namespace default \
  $(kubectl get pods --namespace default \
    -l app=selenium-grid-selenium-chrome-debug \
-o jsonpath='{ .items[0].metadata.name }') 5900-
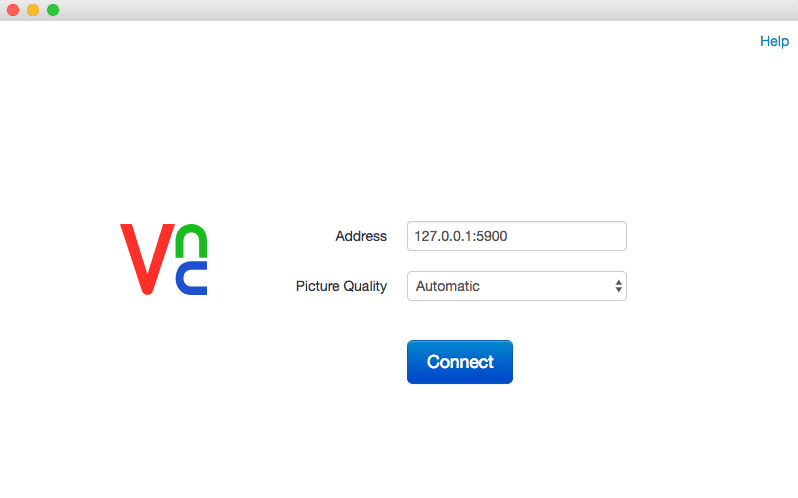
Open VNC® Viewer for Google Chrome
- Address: 127.0.0.1:5900
- Password: secret
Deletes a release from Kubernetes
The helm list function will show you a list of all deployed releases.
$ helm listList of all releases
NAME         	 REVISION	 UPDATED   STATUS  	 CHART     NAMESPACE
selenium-grid	 1       	 Fri May 	 DEPLOYED	 selenium	 default
If you want to delete selenium-grid, you can execute the following command
$ helm delete selenium-grid
release "selenium-grid" deleted
If you want to delete all Helm releases, you can pipe the output of helm ls --short to xargs, and run helm delete for each release name.
$ helm ls --short | xargs -L1 helm delete